In this tutorial, we will build a rich response LLM chat app API, step-by-step using RubyLLM.
RubyLLM is a gem that does a ton of heavy lifting for normalizing and simplifying talking to LLMs. RubyLLM supports all the main providers (over 600 models!) and makes switching providers and models so easy. It’s a treat to use.
We’ll be starting with a fresh rails 8.1.2 app in api mode (rails new llm_rich_chat --api) on ruby 3.4.1.
Setting up RubyLLM
Add the following line to your Gemfile (version 1.11.0 at time of writing)
gem 'ruby_llm'Do a bundle install to install it.
Generating Models and Config
RubyLLM comes with a preset data model in mind for standard llm chat applications. There are generators to do setup and configuration.
Generate the models, migrations, and initializer with the following:
rails generate ruby_llm:installThe initializer defaults to OpenAI, you can update it to whichever provider you want to use, but all models do not support all features. I’m going to default to the cheapest OpenAI model, gpt-5.2-nano, which has support for structured output and tool calls that we’ll be using.
# config/initializers/ruby_llm.rb
RubyLLM.configure do |config|
  config.openai_api_key = ENV['OPENAI_API_KEY'] || Rails.application.credentials.dig(:openai_api_key)
  config.default_model = "gpt-5.2-nano"

  # Use the new association-based acts_as API (recommended)
  config.use_new_acts_as = true
end
As you can see in the initializer, you’ll need an api key either in an .env file or in Rails credentials.
Models
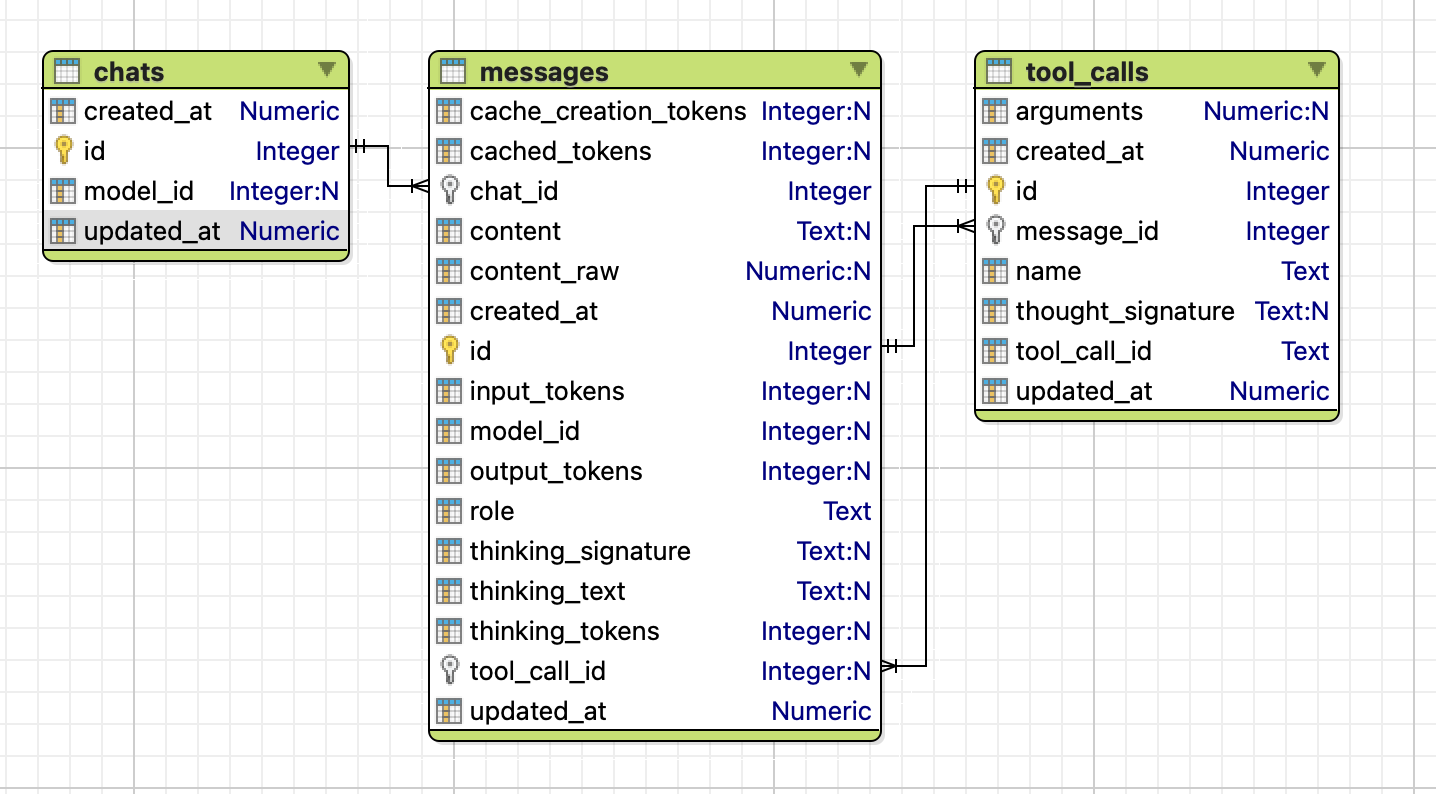
This has created Chat, Message, Model, and ToolCall models for you. These names are configurable if you want to change them, but I will stick with the defaults.
I know I want to have chats with urls like /chats/019c1c2c-7f16-7c87-a2f1-c80cf431f93b, but there is no uuid field in chats by default. We need to add it.
Generate a migration with the following
rails generate migration AddUuidToChats uuid:stringEdit the migration file and change the type to :uuid (if you’re using a db that supports native uuid types), add null: false, and a unique index for fast queries and to prevent (nearly impossible) collisions.
class AddUuidToChats < ActiveRecord::Migration[8.1]
  def change
    add_column :chats, :uuid, :uuid, null: false
    add_index :chats, :uuid, unique: true
  end
end
Run the migrations
rake db:migrateAll those migrations should be applied and we’re ready to begin using RubyLLM!
Our First Chat
We should be set up now, let’s test it out in a rails console
rails cchat = RubyLLM.chat
response = chat.ask "Write a 10 word poem about snails"
response.content
# => Snails trundle under stars, leaving silver trails and patient hope.…8…9…10, yep all there. Hurray!
Scaffolding the App
Now that we see how chatting works, let’s start to scaffold our app.
Running the Server
First, we’ll want to start up our rails server.
In a terminal window, start the rails server
rails sThis should launch a server running on port 3000, that is accessible at http://localhost:3000/
API Routes
For this app, we want 2 main routes
- Show a Chat and all of its Messages
- Create a new Message in a Chat
We need to create 2 new controllers to handle those scenarios. They will be created in a versioned api module to allow for future updates.
rails g controller api::v1::chats
rails g controller api::v1::messages
Add 2 new routes to your routes.rb file
# config/routes.rb
Rails.application.routes.draw do
  # Define your application routes per the DSL in https://guides.rubyonrails.org/routing.html

  # Reveal health status on /up that returns 200 if the app boots with no exceptions, otherwise 500.
  # Can be used by load balancers and uptime monitors to verify that the app is live.
  get "up" => "rails/health#show", as: :rails_health_check

  namespace :api do
    namespace :v1 do
      resources :chats, param: :uuid, only: [:show] do
        resources :messages, only: [:create]
      end
    end
  end
end
The api/v1/chats/:uuid route is straight forward, we want to look up a Chat by uuid and return it with all of its Messages.
The api/v1/chats/:uuid/messages route has a bit more logic, we will either be creating a new Message on an existing or new Chat. We can check if a Chat by uuid exists already, and create it if it doesn’t, then append a new message to the Chat.
We’ll start with Messages since that will be creating all the Chats.
Messages
Update your messages controller to this
class Api::V1::MessagesController < ApplicationController
  def create
    chat_uuid = params[:chat_uuid]
    message = params.require(:message)

    chat = Chat.find_or_create_by!(uuid: chat_uuid)

    response = chat.ask message

    render json: response.content
  end
end
We can test out our routes using a terminal and curl
In a new terminal window, hit the messages endpoint
curl -X POST \
  -H 'Content-Type: application/json' \
  -d '{"message": "Please write a 10 word poem about snails."}' \
  'http://localhost:3000/api/v1/chats/019c1a62-6bf4-7cda-9c86-1a0258544b04/messages'
Which returns…
"Slow snails trace silver trails; quiet gardens breathe beneath patience."Our poem! Success!
Chats
The Chats controller will be used for loading an existing Chat and all of its Messages. We won’t use it in this tutorial, but we can make sure it’s working for the future.
Update the Chats controller to find a Chat and return its ID.
class Api::V1::ChatsController < ApplicationController
  def show
    chat_uuid = params[:uuid]

    chat = Chat.find_by!(uuid: chat_uuid)

    render json: {
      id: chat.id
    }
  end
end
If you inspect your database, you should now see a single Chat record was created with the uuid we provided in that curl request 019c1a62-6bf4-7cda-9c86-1a0258544b04.
curl -X GET 'http://localhost:3000/api/v1/chats/019c1a62-6bf4-7cda-9c86-1a0258544b04'This should returns just our id for now.
{"id":1}Everything is wired up!
Building the Chat
With the basics in place, we can move on to building the chat, customizing its behaviors, and providing value to the users.
System Prompt
When we start a chat, we can give it a system prompt to guide the conversion. RubyLLM does this through a .with_instructions method on the chat. Let’s try it out.
In the Messages controller, add instructions to give some personality to our weather forecasting app using chat.with_instructions
chat = Chat.find_or_create_by!(uuid: chat_uuid)
chat.with_instructions <<~PROMPT
  You are WeatherBot, a helpful weather forecasting companion.
  If a user does not provide their location, assume they are in Minneapolis, MN, latitude 44.98, longitude -93.27
PROMPT
In a real app, location could be passed in, or if you’re using Cloudflare for DNS, added to headers for free.
Let’s see what it says now when we ask "Tell me about yourself"
curl -X POST \
  -H 'Content-Type: application/json' \
  -d '{"message": "Tell me about yourself"}' \
  'http://localhost:3000/api/v1/chats/019c2bd8-7488-7201-abc4-32ea8e87ef64/messages'
"Nice to meet you! I’m WeatherBot, your weather forecasting companion.\n\nWhat I can do:\n- Provide current conditions for any location (temperature, conditions, wind, humidity, etc.)\n- Give hourly and multi-day forecasts (daily highs/lows, rain chances, wind)\n- Show precipitation, UV index, and visibility when available\n- Provide weather alerts for severe conditions in your area\n- Offer quick planning help (what to wear, rain gear, best times for outdoor activities)\n- Use your preferred units (F vs C, mph vs kph)\n\nHow to use me:\n- “What’s the weather in [city] right now?”\n- “Show me the 5-day forecast for [city] in Celsius.”\n- “Do I need an umbrella today in [city]?”\n- “Give me the hourly forecast for [city] this weekend.”\n\nTell me a location and your preferred units, and I’ll fetch the latest forecast for you. Which location would you like to start with?"%
Sweet! Let’s wire up some tools to return real weather data.
Tools
Tools are the hooks for your chat app to pull in your proprietary data. This is where you provide all the value of your app. Today’s state of the art models have excellent tool calling abilities, we just need to let them know what our tools are, what params they need, and when to use them.
You can put anything you want in tool—Database calls, 3rd party API calls, even a series of LLM calls. When a tool completes it will return data to the main LLM chat. The sky is the limit. The LLM will call as many tools as it thinks it needs to complete the task at hand.
In my case, I’m going to just create 2 simple weather API calling tools, one for current weather, and one for weather forecast. When we ask for the current weather or weather forecast, the LLM will call the appropriate tool to get the data we need.
There aren’t any generators for tool scaffolding, so just make a new file at /app/tools/weather_current.rb
class WeatherCurrent < RubyLLM::Tool
description "Gets current weather for a location"
params do
string :latitude, description: "Latitude (e.g., 44.98)"
string :longitude, description: "Longitude (e.g., -93.27)"
end
def execute(latitude:, longitude:)
response = Faraday.get("https://api.open-meteo.com/v1/forecast?latitude=#{latitude}&longitude=#{longitude}¤t=temperature_2m,weather_code,wind_speed_10m,wind_direction_10m,is_day,apparent_temperature,relative_humidity_2m,surface_pressure&timezone=auto&wind_speed_unit=mph&temperature_unit=fahrenheit&precipitation_unit=inch")
response.body
rescue => e
{ error: e.message }
end
endOur weather current tool takes 2 parameters, latitude and longitude, which are defined as strings (so we can have many digits of precision). The execute method is required and will be called by the LLM with the params we define. Using those coordinates, we make a call to a 3rd party open-source, free (personal use) weather API. Whatever we return from the tool will be passed to the LLM, in this case the JSON body with all the weather data.
Applying a Tool
To use a tool in a chat, we need to add it to a chat using .with_tool (or .with_tools if you know you’ll have more than one like I do)
Back in the Messages controller, add the WeatherCurrent tool with chat.with_tools
chat = Chat.find_or_create_by!(uuid: chat_uuid)
chat.with_instructions <<~PROMPT
  You are WeatherBot, a helpful weather forecasting companion.
  If a user does not provide their location, assume they are in Minneapolis, MN, latitude 44.98, longitude -93.27
PROMPT
chat.with_tools(WeatherCurrent)
Let’s see if that works with "What is the current weather?"
curl -X POST \
  -H 'Content-Type: application/json' \
  -d '{"message": "What is the current weather?"}' \
  'http://localhost:3000/api/v1/chats/019c2be8-1d53-7e35-9138-b5a964f3c3c3/messages'
Current weather for Minneapolis, MN (approximate location 44.98, -93.27):

- Time: 9:45 PM CST
- Conditions: Overcast
- Temperature: 23.6°F (-4.7°C)
Amazing!
7-Day Forecast
Now that we have current weather working, let’s add the 7-day forecast.
Make another new tool at /app/tools/weather_forecast.rb
class WeatherForecast < RubyLLM::Tool
  description "Gets 7-day weather forecast for a location"

  params do
    string :latitude, description: "Latitude (e.g., 44.98)"
    string :longitude, description: "Longitude (e.g., -93.27)"
  end

  def execute(latitude:, longitude:)
    response = Faraday.get("https://api.open-meteo.com/v1/forecast?latitude=#{latitude}&longitude=#{longitude}&daily=weather_code,temperature_2m_max,temperature_2m_min&timezone=auto&temperature_unit=fahrenheit")
    response.body
  rescue => e
    { error: e.message }
  end
end
Back in the Messages controller, add the WeatherForecast tool alongside our other one
chat.with_tools(WeatherCurrent, WeatherForecast)Again, let’s test it out with "What is the weather like this week?"
curl -X POST \
  -H 'Content-Type: application/json' \
  -d '{"message": "What is the weather like this week?"}' \
  'http://localhost:3000/api/v1/chats/019c2beb-2f46-7ec6-980e-d67ce380e1e0/messages'
Here’s the 7-day forecast for Minneapolis, MN (lat 44.98, lon -93.27) for 2026-02-04 to 2026-02-10:

- Feb 4: Foggy and cloudy. High 25.8°F, Low 4.9°F
- Feb 5: Cloudy. High 34.8°F, Low 22.2°F
- Feb 6: Cloudy. High 33.3°F, Low 13.3°F
- Feb 7: Cloudy. High 21.5°F, Low 9.0°F
- Feb 8: Cloudy. High 30.3°F, Low 17.3°F
- Feb 9: Cloudy. High 39.2°F, Low 22.9°F
- Feb 10: Cloudy. High 33.9°F, Low 19.9°F

Notes:
- The week starts with fog on Feb 4; otherwise mostly cloudy.
- No precipitation is indicated in this forecast.
- Temperatures range from the low teens to the upper 30s/near 40°F, with a warm spell around Feb 9.

Want an hourly breakdown for any specific day or more detail (wind, humidity, etc.)?%
Giddyup!
Rich Responses
Things are looking good, but its still text-based. I would like my weather app to use icons and all that fancy business. We need a JSON representation of this data, and most importantly, we need it to be the same every time. Fortunately, we can define a structured output contract to use and the LLM will format its output to that definition. Not all providers support structured output, but support is growing and I expect will be standard for all models in the near future.
This is another area where RubyLLM really shines, they abstract away all those definitions and provider differences into a single DSL, RubyLLM::Schema. It lives in another gem RubyLLM::Schema, so we’ll install that next.
Add the following to your Gemfile (version 0.2.5 at time of writing)
gem 'ruby_llm-schema'Do a bundle install to install it.
Creating Schema
Our little weather app will have 2 types of weather to display: a forecast with just highs/lows and an icon, and current weather with more details.
Create a new file at app/schemas/weather_schema.rb
class WeatherSchema < RubyLLM::Schema
  number :temp_high_f, description: 'High Temperature in °F'
  number :temp_low_f, description: 'Low Temperature in °F'
  string :time, description: 'Time of weather reading in iso8601'
  number :weather_code, description: 'WMO weather code'
end
All defined fields are required by default (use required: false to make optional), so the LLM will always include all these.
Next, our detailed weather will have similar fields.
Create a new file at app/schemas/weather_detail_schema.rb
class WeatherDetailSchema < RubyLLM::Schema
  number :barometer_hpa, required: true, description: 'Surface pressure in hPa'
  number :current_temp_f, description: 'Current temperature in °F'
  string :date, description: 'Date of weather reading in iso8601'
  number :humidity_percent, description: 'Humidity in percent'
  number :temp_f, description: 'Current Temperature in °F'
  number :weather_code, description: 'WMO weather code'
  number :wind_direction_deg, description: 'Wind direction in miles per hour'
  number :wind_speed_mph, description: 'Wind speed in miles per hour'
end
With our 2 schemas, we can now make our chat message schema that will return a weather forecast, current weather, or a text message fallback if needed. This is generally called a union type, but in RubyLLM::Schema, they call it any_of.
Create a new file at app/schemas/chat_message_schema.rb
class ChatMessageSchema < RubyLLM::Schema
  any_of :content do
    object do
      string :type, required: true, enum: ["weather_current"], description: "Type of content returned"
      object :weather, of: WeatherDetailSchema
    end

    object do
      string :type, required: true, enum: ["weather_forecast"], description: "Type of content returned"
      array :forecast, of: WeatherSchema
    end

    object do
      string :type, required: true, enum: ["text"], description: "Type of content returned"
      string :message, description: "Off topic or clarifying question message"
    end
  end
end
The type field uses an enum with a single value to give us a consistent key to determine which response type it is on the frontend.
Using Schema in Chat
We have defined schema, but not told our chat to use them yet.
In the Messages controller, update the instructions to help guide the usage of the 3 types of response, and add the chat message schema using .with_schema
if chat.nil?
  chat = Chat.create!(
    uuid: chat_uuid,
  )
  chat.with_instructions <<~PROMPT
    You are WeatherBot, a precise data formatting assistant.
    If a user does not provide their location, assume they are in Minneapolis, MN (44.98, -93.27).

    ### RESPONSE RULES
    1. **PRIORITY:** If you have successfully retrieved weather data (current or forecast), you **MUST** use the `weather` or `forecast` schema objects.
    2. **FORBIDDEN:** NEVER describe, summarize, or repeat weather data inside the `message` text field. If you have the data, populate the JSON object.
    3. **TEXT FIELD USAGE:** Only use the `message` (text) schema for:
      - Clarifying vague user requests.
      - Asking for a location if the default is not appropriate.
      - Politely declining off-topic questions (e.g., "I can only help with weather").
  PROMPT
  chat.with_tools(WeatherCurrent, WeatherForecast)
  chat.with_schema(ChatMessageSchema)
end
Bugfix
Unfortunately there is a bug in this version of RubyLLM that will break any structured conversations.
You can work around this by monkey-patching an OpenAI formatting method.
Add the following to the bottom of your RubyLLM initializer config/initializers/ruby_llm.rb.
# temporary fix for https://github.com/crmne/ruby_llm/issues/497
module RubyLLMPatches
  module OpenAi
    module Media
      def format_content(content)
        if content.is_a?(RubyLLM::Content::Raw)
          content.value.is_a?(Hash) ? content.value.to_json : content.value
        else
          super
        end
      end
    end
  end
end

RubyLLM::Providers::OpenAI::Media.singleton_class.prepend(RubyLLMPatches::OpenAi::Media)
Testing Out Tools
Let’s start a new chat and test out the different schemas
curl -X POST \
  -H 'Content-Type: application/json' \
  -d '{"message": "Whats the weather like today?"}' \
  'http://localhost:3000/api/v1/chats/019c3ec6-a5b3-7ece-a10d-298e6f5eef4b/messages'
{
"content": {
"type": "weather_current",
"weather": {
"barometer_hpa": 987.9,
"current_temp_f": 30.4,
"date": "2026-02-08T13:30:00-06:00",
"humidity_percent": 75,
"temp_f": 30.4,
"weather_code": 3,
"wind_direction_deg": 151,
"wind_speed_mph": 8.4
}
}
}curl -X POST \
-H 'Content-Type: application/json' \
-d '{"message": "And the rest of the week?"}' \
'http://localhost:3000/api/v1/chats/019c3ec6-a5b3-7ece-a10d-298e6f5eef4b/messages'{
"content": {
"type": "weather_forecast",
"forecast": [
{
"date": "2026-02-08",
"temp_high_f": 33.3,
"temp_low_f": 24.1,
"weather_code": 45
},
{
"date": "2026-02-09",
"temp_high_f": 46.9,
"temp_low_f": 26.6,
"weather_code": 3
},
{
"date": "2026-02-10",
"temp_high_f": 34.4,
"temp_low_f": 24.0,
"weather_code": 71
},
{
"date": "2026-02-11",
"temp_high_f": 29.5,
"temp_low_f": 19.2,
"weather_code": 3
},
{
"date": "2026-02-12",
"temp_high_f": 31.7,
"temp_low_f": 25.4,
"weather_code": 73
},
{
"date": "2026-02-13",
"temp_high_f": 32.3,
"temp_low_f": 24.0,
"weather_code": 71
},
{
"date": "2026-02-14",
"temp_high_f": 33.3,
"temp_low_f": 25.9,
"weather_code": 45
}
]
}
}curl -X POST \
-H 'Content-Type: application/json' \
-d '{"message": "What are you thoughts on snails?"}' \
'http://localhost:3000/api/v1/chats/019c3ec6-a5b3-7ece-a10d-298e6f5eef4b/messages'{
"content": {
"type": "text",
"message": "I can only help with weather data. If you’d like weather information, I can fetch current conditions or a forecast. Please share a location (default is Minneapolis, MN) and I’ll grab it."
}
}Hot Dog!
Streaming Response
The last step to make this feel really great, is to stream the data bit by bit, like chat-based LLMs do. Once again, the fine folks at RubyLLM have you covered. Streaming chunks is built-in, and once again abstracts away all the provider differences.
We’re going to use Server Sent Events (SSE) to stream the chat response. There are other options like websockets, but SSE will be a great starting point, and should work for most cases.
There are a handful of updates to make to change the messages controller to use SSE.
class Api::V1::MessagesController < ApplicationController
  include ActionController::Live

  def create
    response.headers['Content-Type'] = 'text/event-stream'
    response.headers['Cache-Control'] = 'no-cache'
    response.headers['X-Accel-Buffering'] = 'no'
    response.headers['Last-Modified'] = Time.now.httpdate

    sse = SSE.new(response.stream, retry: 300, event: "chat-message")

    chat_uuid = params[:chat_uuid]
    message = params.require(:message)

    chat = Chat.find_or_create_by!(uuid: chat_uuid)
    chat.with_instructions <<~PROMPT
      You are WeatherBot, a precise data formatting assistant.
      If a user does not provide their location, assume they are in Minneapolis, MN (44.98, -93.27).

      ### RESPONSE RULES
      1. **PRIORITY:** If you have successfully retrieved weather data (current or forecast), you **MUST** use the `weather` or `forecast` schema objects.
      2. **FORBIDDEN:** NEVER describe, summarize, or repeat weather data inside the `message` text field. If you have the data, populate the JSON object.
      3. **TEXT FIELD USAGE:** Only use the `message` (text) schema for:
        - Clarifying vague user requests.
        - Asking for a location if the default is not appropriate.
        - Politely declining off-topic questions (e.g., "I can only help with weather").
    PROMPT
    chat.with_tools(WeatherCurrent, WeatherForecast)
    chat.with_schema(ChatMessageSchema)

    full_response_buffer = ""

    begin
      chat.ask(message) do |chunk|
        if chunk.content
          full_response_buffer += chunk.content
          sse.write(full_response_buffer)
        end
        response.stream.flush rescue nil
      end
    rescue RubyLLM::Error => e
      Rails.logger.error "RubyLLM stream failed for chat #{chat_uuid}: #{e.message}"
      sse.write({ error: "Stream failed" })
      raise e
    rescue StandardError => e
      Rails.logger.error "Stream error for chat #{chat_uuid}: #{e.message}"
      sse.write({ error: "An error occurred" })
      raise e
    end
  ensure
    sse.close
  end
end
The changes are
include ActionController::Liveat the top to bring inSSE- Some headers to set the response to stream, disable caching, and disable nginx buffering so chunks come in as quickly as possible. 1. We created a new
SSE, and then write to it with each chunk coming from the chat. response.stream.flush rescue nilsends data to the client immediately (instead of waiting for a buffer chunk of a certain size).- There is a bit of error handling
- Finally, we ensure that the connections are all closed and cleaned up.
Does it work?
What does this new streamed response look like?
curl -N \
  -X POST \
  -H 'Content-Type: application/json' \
  -H 'Cache-Control: no-cache' \
  -d '{"message": "Please write a 10 word poem about snails."}' \
  'http://localhost:3000/api/v1/chats/019c3f01-32be-78bf-9267-bc7dd882f570/messages'

retry: 300
event: chat-message
data:

retry: 300
event: chat-message
data: {"

retry: 300
event: chat-message
data: {"content

retry: 300
event: chat-message
data: {"content":{"

retry: 300
event: chat-message
data: {"content":{"type

retry: 300
event: chat-message
data: {"content":{"type":"

retry: 300
event: chat-message
data: {"content":{"type":"text

retry: 300
event: chat-message
data: {"content":{"type":"text","

retry: 300
event: chat-message
data: {"content":{"type":"text","message

retry: 300
event: chat-message
data: {"content":{"type":"text","message":"

retry: 300
event: chat-message
data: {"content":{"type":"text","message":"I

retry: 300
event: chat-message
data: {"content":{"type":"text","message":"I can

retry: 300
event: chat-message
data: {"content":{"type":"text","message":"I can only

...
Amazing!
Handling Streamed JSON
However, when we start trying to actually use this partial json, we’re going to run into an error JSON parsing something like '{"content":{"type":"text'. That’s not valid JSON!
JSON.parse '{"content":{"type":"text'
=> unexpected end of input, expected closing " at line 1 column 25 (JSON::ParserError)
What we need is something that can go through the string, letter by letter, and track the opening of quotes, brackets, etc, and auto add the missing closing elements.
Incredibly, there is a recently-created gem JsonCompleter made to solve this exact issue! On top of that it does this a very efficient way by maintaining the string state between chunks. Since most of the response doesn’t change with each chunk (only adding to the end), it makes so much sense to only parse the new additions.
Let’s try it out.
Add this line to your Gemfile
gem 'json_completer'Do a bundle install to install it.
In the Messages controller,
- Require the gem
- Create new
JsonCompleter .completeyourfull_response_bufferin each SSE write
You should be all set!
require 'json_completer'

class Api::V1::MessagesController < ApplicationController
  include ActionController::Live

  def create
    response.headers['Content-Type'] = 'text/event-stream'
    response.headers['Cache-Control'] = 'no-cache'
    response.headers['X-Accel-Buffering'] = 'no'
    response.headers['Last-Modified'] = Time.now.httpdate

    sse = SSE.new(response.stream, retry: 300, event: "chat-message")

    chat_uuid = params[:chat_uuid]
    message = params.require(:message)

    chat = Chat.find_or_create_by!(uuid: chat_uuid)
    chat.with_instructions <<~PROMPT
      You are WeatherBot, a precise data formatting assistant.
      If a user does not provide their location, assume they are in Minneapolis, MN (44.98, -93.27).

      ### RESPONSE RULES
      1. **PRIORITY:** If you have successfully retrieved weather data (current or forecast), you **MUST** use the `weather` or `forecast` schema objects.
      2. **FORBIDDEN:** NEVER describe, summarize, or repeat weather data inside the `message` text field. If you have the data, populate the JSON object.
      3. **TEXT FIELD USAGE:** Only use the `message` (text) schema for:
        - Clarifying vague user requests.
        - Asking for a location if the default is not appropriate.
        - Politely declining off-topic questions (e.g., "I can only help with weather").
    PROMPT
    chat.with_tools(WeatherCurrent, WeatherForecast)
    chat.with_schema(ChatMessageSchema)

    full_response_buffer = ""
    completer = JsonCompleter.new

    begin
      chat.ask(message) do |chunk|
        if chunk.content
          full_response_buffer += chunk.content
          sse.write({
            content: completer.complete(full_response_buffer)
          })
        end
        response.stream.flush rescue nil
      end
    rescue RubyLLM::Error => e
      Rails.logger.error "RubyLLM stream failed for chat #{chat_uuid}: #{e.message}"
      sse.write({ error: "Stream failed: #{e.message}" })
      raise e
    rescue StandardError => e
      Rails.logger.error "Stream error for chat #{chat_uuid}: #{e.message}"
      sse.write({ error: "An error occurred: #{e.message}" })
      raise e
    end
  ensure
    sse.close
  end
end
Is it valid JSON now?
curl -N \
  -X POST \
  -H 'Content-Type: application/json' \
  -H 'Cache-Control: no-cache' \
  -d '{"message": "Please write a 10 word poem about snails."}' \
  'http://localhost:3000/api/v1/chats/019c3f1b-44b4-72c0-a3ec-8196af551299/messages'
retry: 300
event: chat-message
data:

retry: 300
event: chat-message
data: {"":null}

retry: 300
event: chat-message
data: {"content":null}

retry: 300
event: chat-message
data: {"content":{"":null}}

retry: 300
event: chat-message
data: {"content":{"type":null}}

retry: 300
event: chat-message
data: {"content":{"type":""}}

retry: 300
event: chat-message
data: {"content":{"type":"text"}}

retry: 300
event: chat-message
data: {"content":{"type":"text","":null}}

retry: 300
event: chat-message
data: {"content":{"type":"text","message":null}}

retry: 300
event: chat-message
data: {"content":{"type":"text","message":""}}

retry: 300
event: chat-message
data: {"content":{"type":"text","message":"I"}}

retry: 300
event: chat-message
data: {"content":{"type":"text","message":"I can"}}

retry: 300
event: chat-message
data: {"content":{"type":"text","message":"I can only"}}

retry: 300
event: chat-message
data: {"content":{"type":"text","message":"I can only help"}}
Wowee Zowee! We can see that each response is complete, valid JSON! Notice that fields are null when the completer is unsure what type they are.
Wrapping up
This should give you a solid starting point to create a rich response streaming chat API. I hope you enjoyed the ride.
There are a number of things you could do now to continue building this app, but they are out of the scope of this tutorial.
If you want to keep going, here are some next steps to flush this project out:
- Create users
- Add authorization
- Add a
user_idcolumn onchatsso users own a chat - Require an authed user to create or load a chat in the chats controller
- Require an authed user, and check if they are the owner of the chat, in the Messages controller
- Make a Chat serializer that returns all messages (and tool calls)
- Handle tool calls in the stream, so users know when a tool is being called
- And of course, create a frontend app to handle everything!
Published
Comments